
If you’ve just purchased a new branded USB, or indeed any other kind of USB device and noticed incredibly slow read and write speeds in Windows, then there are a few things you can do to speed things up.
Ideally, USB 3.0 should be comfortably achieving write speeds of at least 5GBps per second, perhaps even faster than that. However, in this piece, we’ll be covering some of the ways you can unlock the true potential of your USB.
What Could Be Causing Slow USB Transfer Speeds?
Typically, USB transfer speeds will slow significantly if you are experiencing one or more of the following issues:
- Bad sectors.
- Unstable power supplies.
- Transferring large files.
- The USB port is outdated and therefore not compatible with a newer drive.
- USB is almost full, therefore limiting transfer speeds.
You can usually recognise when a USB is transferring at a slower rate if it is failing to reach the following transfer rates, these are typically:
- USB 3.1 – 10GBps
- USB 3.0 – 5GBps
- USB 2.1 – 480Mbps
- USB 1.1 – 12Mbps
You may also notice that when transferring files the process never reaches 100%, or the process can last hours even for smaller files.
If this is happening to you, there are a few things you can do.
Method One: Recover Data

If your USB drive is failing to read and write files, then you may have bad (corrupted) sectors in your drive, which may mean you’ve lost your data. To remedy this, you can recover all of your files from the USB and format the drive to repair the bad sectors, to increase speeds.
Reliable data recovery software will be able to scan the USB and gather all of the recoverable data you may have lost.
Step 1: Run Your Favoured Data Recovery Software
Connect the USB to your device and launch the data recovery software. Find the area that allows you to scan external drives and scan it – it will then begin scanning for lost files.
Step 2: Search Through Lost Files
What appears may differ depending on your chosen software, but you should see a list of data that has been recovered after the scan concludes.
Step 3: Restore the Data
Once you’ve selected all of the data you’d like to recover, you can save it to a secure location on your device for easy access later.
Method Two: Reformat to Repair Bad Sectors
Once you’ve obtained the data you need, you can now proceed to format the flash drive to repair bad sectors and improve speeds. To do this:
Step 1: Connect Your USB to the Device
Open ‘This PC’ (or equivalent depending on the device you’re using) and right click the USB in question, and select format.
Step 2: File System ‘NTFS’
Set the file system as NTFS, click start, check the Quick Format box and click OK to format your USB.
Once you’ve done this your USB device will be much faster, and you can even apply the recovered files back into the flash drive if you want to.
Method Three: Convert the USB File System to NTFS
Most USB’s are set to the FAT32 file system as standard, due to its capability with a wide range of devices. However, if you’re looking to improve file transfer speeds, NTFS is a far better option for you.
To do this, carefully follow the instructions below, however backup your data or move it to another device first.
Step 1: Press “Windows + “R”
Once Run appears on your screen, type “diskmgmt.msc” this will open up disk management.
Step 2: Select the Partition
Select the partition you’d like to edit and select format.
Step 3: Volume Label
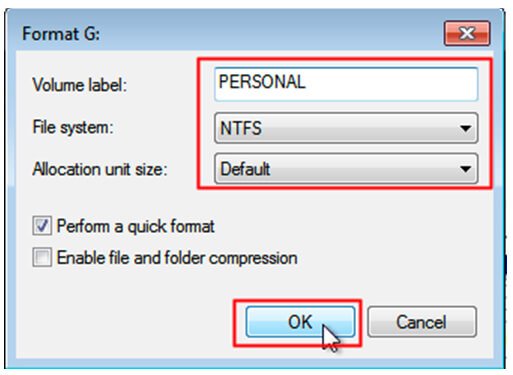 Image from DiskPart
Select the volume label and then select NTFS file system, default the allocation unit size, then check perform a quick format, and then OK.
Method Four: Optimise Performance
Optimising the overall performance of your USB, is a great way to boost transfer speeds.
To do this, follow these steps:
Step 1: Device Manager

Image from Windows
Right click on the Windows icon on the bottom left of the desktop, and type ‘device manager’ into the search bar.
Step 2: Access Disk Drives
Toggle down to Disk Drives and click to expand, here you should find your USB device, right click on it and select Properties.
Step 3: Policies
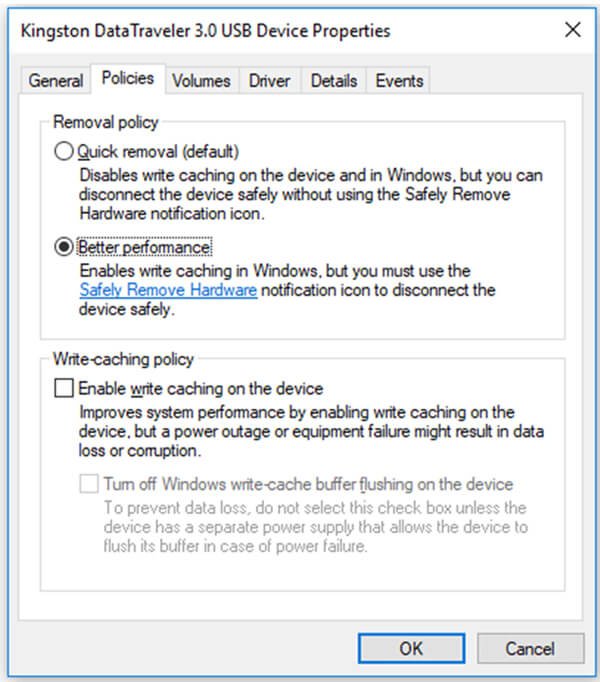
Image from Medium
Navigate to the Policies tab, and check Better Performance, once you’ve confirmed this it will optimise your drive and once you’ve rebooted your computer, you’ll notice improved read and write performance from the port itself.
Method Five: Enable 3.0 Drives in BIOS
On most modern devices, USB 3.0 is usually enabled as standard. However, if you have either a USB 3.0 or a 3.1 and it’s running slowly, you might want to check and ensure that USB 3.0 is enabled in BIOS.
Here’s how to do this:
Step 1: Enter BIOS
Restart your computer, and as it’s rebooting select F2 and Delete simultaneously on your keyboard to enter BIOS.
Step 2: Advanced Tab
Once you’re in BIOS, which should look something like this:
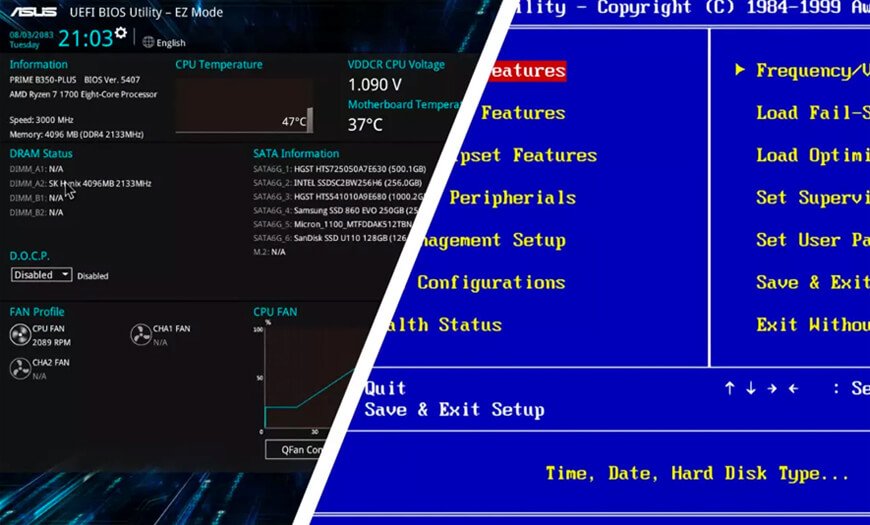
Image from TechSpot
Use the arrow keys to navigate through to the Advanced tab.
Step 3: USB Configuration
Now use the up and down keys to select USB Configuration, and then select enter.
Step 4: USB 3.0 Support
If you notice that the USB 3.0 Support has been disabled, utilise the arrow keys again to select it and press enter.
Step 5: Enable
When the options window appears, choose enabled and press enter.
Step 6: Save & Exit
Once you’ve made the changes press the F10 key to save your changes.
When your computer boots again, you can once again reconnect your USB device, and you should notice a marked difference in the speed of transfers between the USB and your device.
Method Six: Update USB Driver or Chipset
If you’re using your USB in conjunction with a laptop, the USB port is typically connected to something called the chipset, which acts as the interface between the USB and the computer itself.
Therefore, if you’re looking to solve your USB transfer speed issues, looking to update the USB driver or chipset driver is never a bad idea.
In order update the USB driver:
Step 1: Access Device Manager
Connect your USB to the computer and open the This PC area, select Manage, and then click Device Manager.
Step 2: Update the Driver
Open out Disk Drives, right click on the USB drive and select Update Driver.
Step 3: Scan Automatically
Select Scan automatically for updated driver software.
The process is similar to update the USB chipset:
Step 1: Access Device Manager
Connect your USB, right click on the Windows icon, and select Device Manager.
Step 2: System Devices
Toggle System devices and double click on the Intel chipset device in the list.
Step 3: Driver Tab
Toggle across to the Driver tab and then click Update driver.
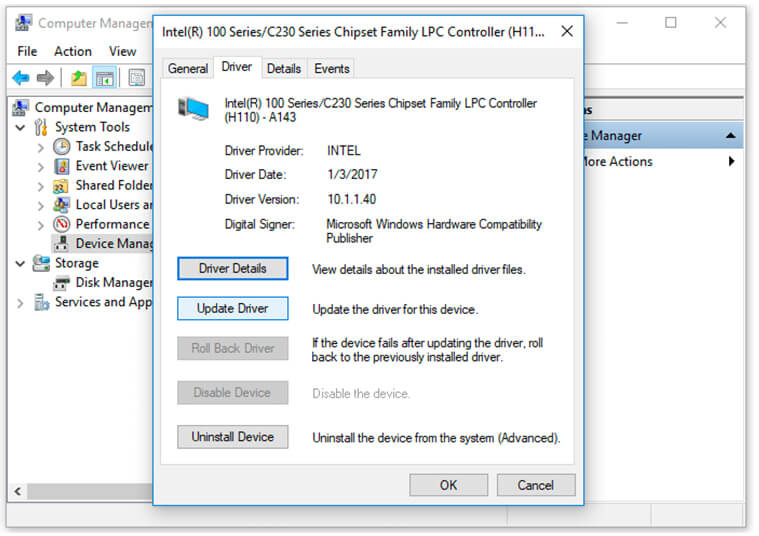
Image from EaseUs
Takeaways
Most modern USB 3.0 ports run with a max transfer speed of 5GB per second. However, if you’re running an older Windows machine, you’ll be using an older spec, which means even the most modern of USB’s will be running far slower than you’d ideally want. If that’s the case, it’s certainly worth considering a hardware upgrade.
However, if you do choose to use one of the methods we’ve outlined, then it’s always a good idea to backup your data beforehand. It’s not worth losing your data, even if the USB is running slowly.
If you’d like more USB advice, or you’d like to learn more about our extensive product ranges, why not get in touch with us today?


