Do you use your Branded USB Stick to store and transport data, some of which may be of a sensitive nature. But, have you considered what would happen if you were to lose or have your flash drive stolen?
Should this happen, then your personal data is effectively in the hands of whomever steals or finds your flash drive, whether they intend to use it maliciously or not.
However, there is something you can do about this to ensure that your drive and data is protected in every eventuality and this is to encrypt the device.
What is USB Encryption?
USB encryption can be achieved by the following means:
- By using specialised encryption software.
- Native software encryption.
- Purchasing an encrypted USB stick – such as the SafeToGo Solo.
By using one of these methods to encrypt your device, you ensure that no one can gain access to your personal data unless they already know the decryption key.
Although a preconfigured encryption might be a bit of a pain to access, since you’ll need to input your password every time you access the device, it’s certainly worth it if you’re transporting sensitive data, and you don’t want to encrypt the device yourself.
You can do this manually by using the options available on your Windows or Mac device, which is what we’ll be covering in this piece.
How to Encrypt a Flash Drive with BitLocker on Windows
Bitlocker is an example of a native software encryption tool, and can be found on Windows 7 or later.
Please note, that if any of the following steps aren’t working for you it’s possible you’re running an older version of Windows.
Step 1: Connect your USB, however, ensure that you’ve moved any files to a safe place and ensure that it is empty before beginning this process.
Step 2: Head to file explorer and find your USB device.
Step 3: Then right click on the drive and select turn on BitLocker, this will automatically install the programme for you.
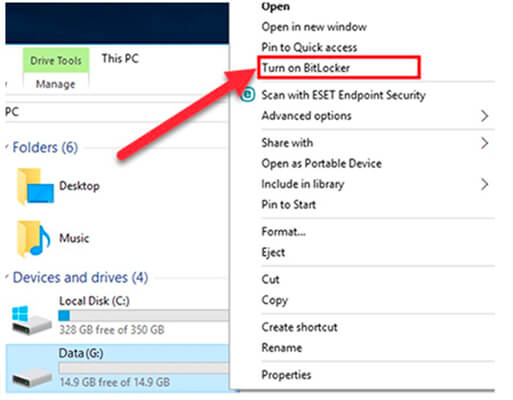
Image from Hacker9
Step 4: For the next step you’ll be asked how you’d like to lock the drive. You can select a password or use a smart card – for the purposes of this blog, we’ll be using the password example, which is the most common.
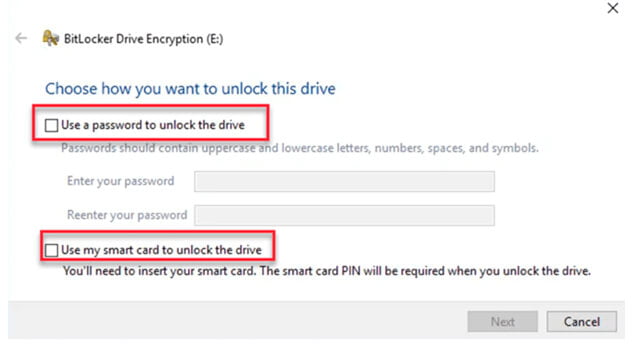
Image from Hacker9
Step 5: Think of a strong password, this must be a tricky combination of lower and uppercase letters, numbers and symbols.
Step 6: Choose how you’ll generate a recovery key – you can either save this as a file or a print out. Whichever option you choose, be aware that you’ll need this should you lose your password, so it’s best kept safe.
Step 7: To encrypt your flash drive on Windows with BitLocker, select the Encrypt used disk space only.
Step 8: Next, you’ll be asked to select the encryption mode. If you’re running a Windows 10 device of at least 15.11, then select New encryption mode. If not, then select Compatible mode, this will select the best option for your drive and operating system.
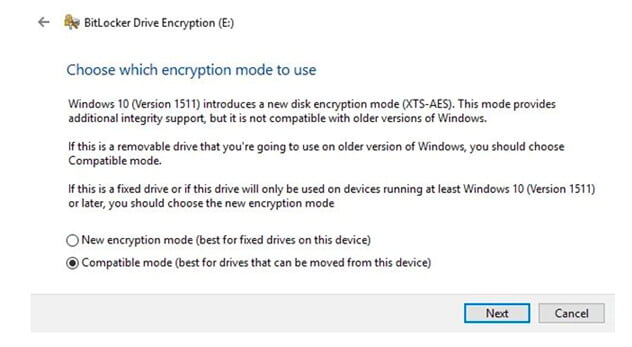 Image from Hacker9
Step 9: Once you’re sure you’re ready to encrypt, click Start encrypting. The time it takes to complete this process will depend largely on the size of your USB.
How to Encrypt a Flash Drive with Veracrypt on Windows
Although Veracrypt is an excellent alternative to BitLocker, you may need to work through a couple of extra steps when looking to encrypt the device. That said, it offers a bit more flexibility for the advanced users and gives you more options for encryption and hashing algorithms.
Step 1: Visit Veracrypt and download the option that matches your operating system.
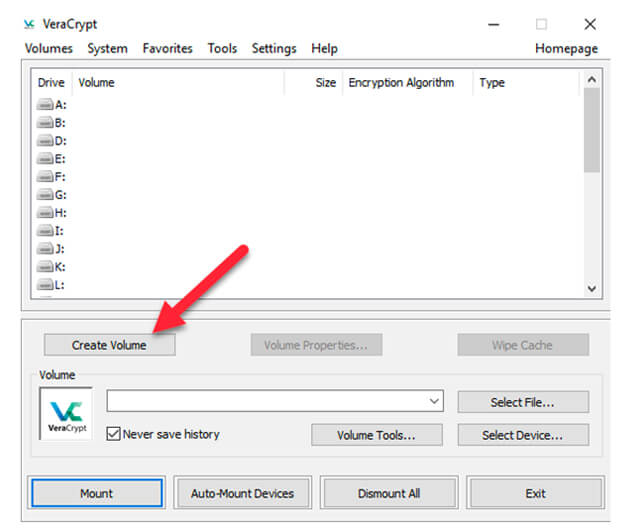
Step 2: Connect your USB drive, once again ensure this is blank, run Veracrypt and click the Create volume option.
Step 3: Select Encrypt a non-system partition or drive.
Step 4: Select Standard Veracrypt volume.
Step 5: Where it says Volume Type, click Select Device and find your flash drive.
Step 6: From here select Create encrypted volume and format it, if you have any stored data on the device at this point it will be erased.
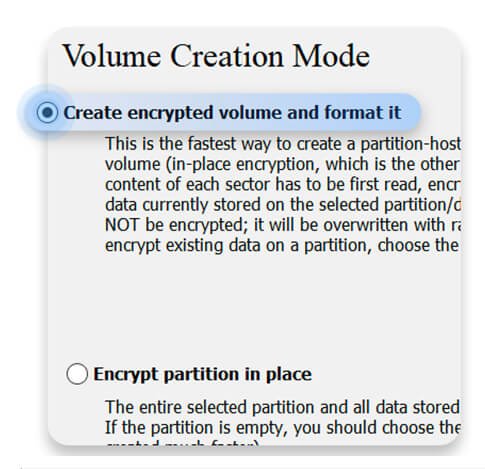 Image from NORDVPN
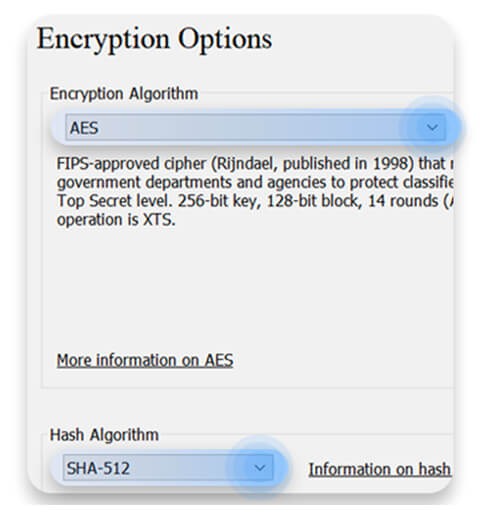
Step 7: Now you’ll be selecting the hashing and encryption options we mentioned earlier. If you’re unsure, stick with AES and SHA-512.
Step 8: On the volume size window click next.
Step 9: Select a strong password, similar to BitLocker this should be a combination of letters, numbers and symbols.
Step 10: Once you get to the Volume format option, move the slider until the bar turns green and then select format. Like BitLocker, how long this takes varies on the size of the USB drive.
How to Encrypt a Flash Drive on macOS

Just like Windows, macOS also has its own encryption software to create passwords for USB drives.
Step 1: Once again, transfer any current data, otherwise this will be overwritten during the encryption process.
Step 2: Open Finder and then look for Disk Utility
Step 3: Select your USB device from the left-hand column.
Step 4: Toggle to the Erase tab, and in the Format box select Mac OS Extended (Journaled, Encrypted), and then select a name for your device.
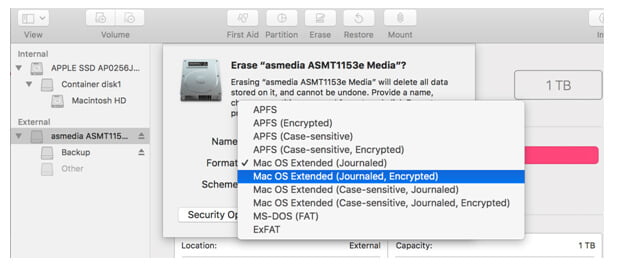
Image from AppleSupport
Step 5: Once the window prompts you to create a password, select something with a good combination of upper and lowercase letters, numbers and symbols. Bear in mind that the password should at least be memorable to you – if you lose this password you’ll have a hard time retrieving your data.
Step 6: Once you select choose, your flash drive will begin to encrypt. Once this process is completed your USB is now encrypted.
More About Encryption
It’s worth remembering that if you use native encryption tools for Windows or Mac, you’ll only ever be able to decrypt and access your data on this same operating system. If you wish to make this data available across all macOS releases for example, you’ll need to partition your USB (which we’ve covered here), make file copies, and change each partition to ensure it’s compatible with those specific operating systems.
To sidestep this, you could partition the USB and encrypt your files, while leaving the software itself decrypted. This means you can decrypt only certain parts of the drive, but leave the remainder free to use without a password.
If you’d like more USB advice, or you’d like to learn more about our extensive product ranges, why not get in touch with us today?


