USB drives are one of the most trustworthy and reliable means of holding and transferring data, however, as with any electronic device, they do sometimes run into some issues.
This could sometimes be the USB Stick itself, or the hardware/software combination that you’re running it on – check out our blog on the latest Apple Monteray update.
One of the most common issues we’re asked about is when you notice that your USB is reading as full, when you know that it isn’t. You might be prompted to delete files on your flash drive to make room for new files you’re attempting to write, but you’re completely sure you have adequate space.
So, what do you do?
In this piece, we’ll be walking through the steps you need to take to restore your USB and transfer files once again.
Check Your Available Memory

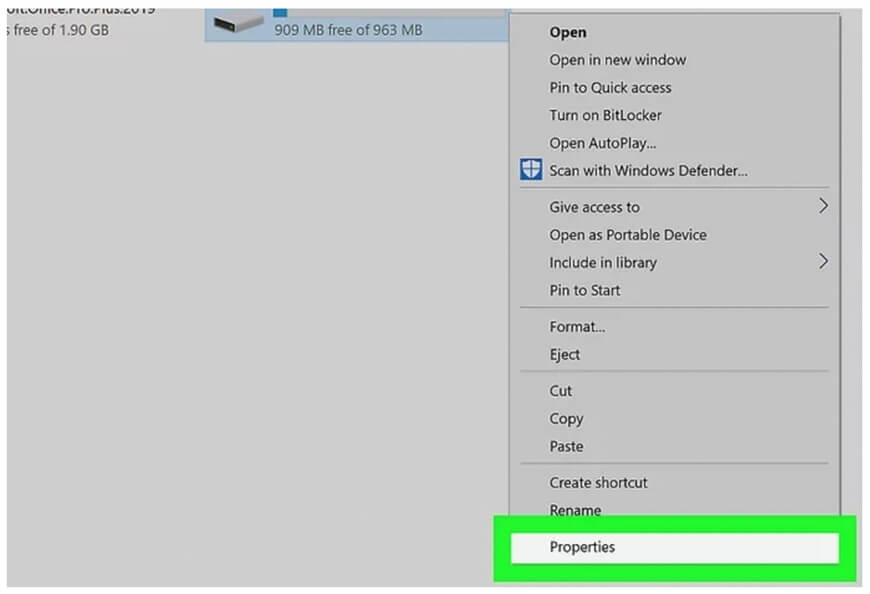
Image from WikiHow
Although you already know you have some space on the flash drive, it’s always worth double-checking that you’re not simply trying to move an especially large file to your USB without the adequate memory to do so.
To do this on Windows, navigate to My Computer or This PC, and you’ll be able to see the memory available displayed underneath your drive. If you want a further breakdown, you can right click on your drive, and under Properties you’ll be able to see a clearer picture of what memory you have remaining.
On a Mac click on the drive and right click, and select Get Info. If you can’t see any obvious issues here, then the problem could be one or more of the following:
- Over Provisioning.
- Hidden Files.
- User Error.
We’ll cover each of these below and how to fix them.
Reformatting
Formatting your device restores the USB to its full capacity.
The most common reason for this is that a pre-formatted file system is present on your drive which might be limiting the amount of data you’re trying to move across.
For instance, the FAT32 file system has a limiting file size of 4GB. Essentially, this means that no matter how much data you have available on your USB, you won’t ever be able to transfer more than 4GB of data at once.
The best thing to do here is to reformat your drive, so it can handle such a considerable data transfer. This is very easy to do yourself, and we covered how to do this on Windows at length in a previous post (link to 6 Ways to Fix Slow USB Transfer Speeds in Windows).
Here we’ll walk you through how to do this on a Mac, but do note that you should remove any existing data from the drive before doing this, otherwise your data will be wiped:
Step 1: Connect USB to the Mac.
Step 2: Open Disk Utility – Hit Command + Space to open the search bar, then type Disk Utility, then push enter.
Step 3: Select your USB drive from the panel on the left-hand side.
Step 4: Click and then change to the Erase tab.
Step 5: In the Volume Format selection box, you’ll be able to select the file system you’d like to use.
Step 6: Confirm the Erase.
Over Provisioning

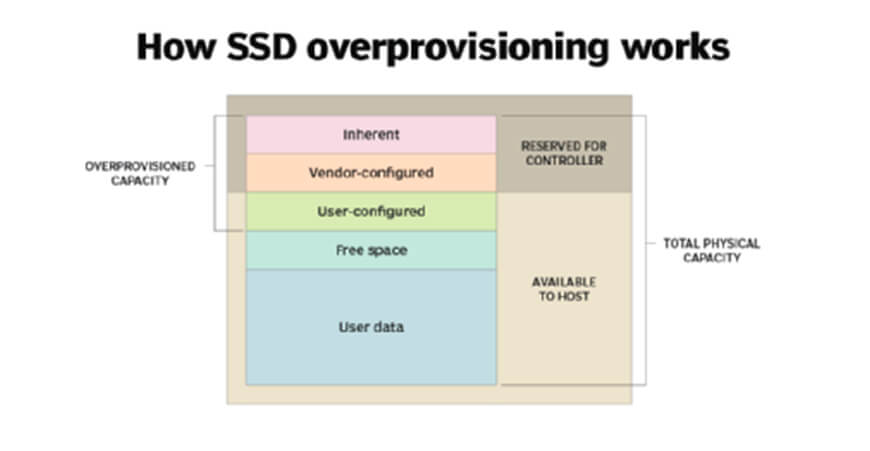
Image from TechTarget
Another possibility is something known as over provisioning, which is a means of withholding a section of storage space to increase memory controller performance.
In other words, over provisioning will help to make a device far more efficient, but the drawback of this is that it takes up a small segment of the allotted memory capacity. The image above illustrates this well.
This is something that you might typically see as standard on high quality USB drives, so if this is the reason you aren’t able to store as much as you were intending, then you will just have to adapt your usage to account for this.
Detecting Hidden Files
If none of the above appears on the issue for you, then it’s likely you have some files that you probably weren’t even aware existed.
That’s because, even when you open the box of your brand new flash drive, the drive is not really ‘empty’.
In fact, most of the time no electronic device, whether that be a USB or computer, is ever really blank, since they contain a variety of folders hidden from view.
In the case of the USB, these folders are utilised during the formatting of your drive, and help the computer communicate with the USB itself.
For example, there are some hidden files that contain data to help index the files when they are added to the drive, and while these aren’t the culprit behind filling up your available memory, there is a folder that might be.
Once the trash/recycling folders start to build up, they can take up a lot of the available space on the drive.
Most of us now know that even when you delete something on your device, whether that be a photo or a Word document, that file still exists in some form. In other words, deleting something doesn’t really mean that it’s gone completely.
These remnants make up the trash files that may be the cause of your memory woes.
Think about when you delete something on your computer, usually this item is sent to the Trash or Recycle bin, from there you can either erase it completely or restore it to your machine – the same applies for your USB.
The big difference though, is that you can’t simply empty the bin on your USB like you do on a desktop. The only way to do this is to use your computer.
Below, we’ve outlined precisely how you can delete these folders for both Mac and Windows.
How to Delete USB Trash Folders on a Mac
Please note that this method is solely for Mac users, if you delete the files via Windows and then plug it into a Mac it will regenerate the folders.

Step 1: Plug in your USB.
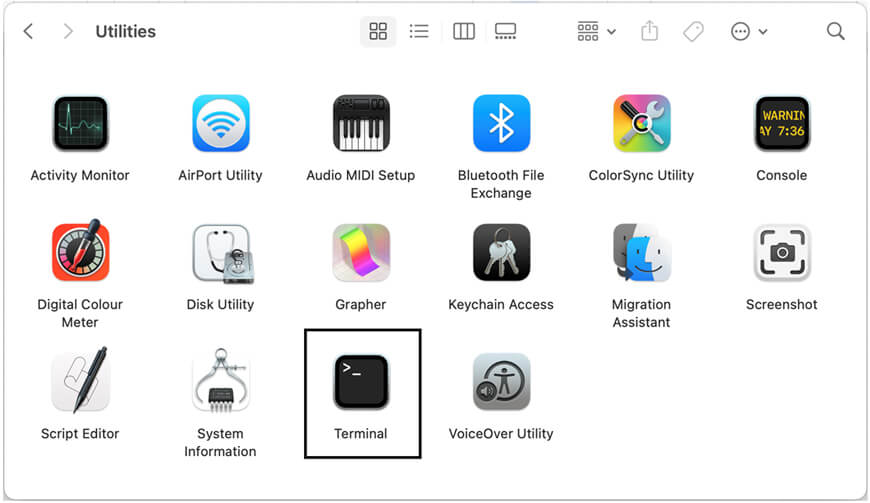
Step 2: Open Finder, select Applications, scroll down to Utilities.
Step 3: Select Terminal.
Step 4: Type: “sudo rm -R”, press once on the spacebar to create a space after the R.
Step 5: Click on the trash icon.
Step 6: Select all the trash files, drag them into the Terminal window you just opened and press enter.
Step 7: Enter the Admin password and push enter.
How to Delete USB Trash Folders in Windows
Step 1: Plug in the USB.
Step 2: Open the drive through File Explorer.
Step 3: Select the files you don’t want.
Step 4: Right click and toggle to delete.
Step 5: Open the desktop Recycle Bin, right click and select Empty Recycle Bin.
User Error
If these issues aren’t the cause of the issues, then could it really come down to a user error?
All digital data is measured in bytes, you’re probably already aware of this. You’re probably also aware of the units that measure bytes, such as gigabytes (GB), but perhaps you are less familiar with a gibibyte (GiB).
One GiB is equal to around 1.074 GB, and this distinction is quite important.
Computers and other devices can often display the two incorrectly, so you may think that your drive is running with 500GB, but actually we’re running with more like 465GiB, which may confuse you into thinking you have more space than you really have – this is especially the case with Windows machines.
Takeaways
If you are being given a prompt to tell you that your USB is full, when you know that it isn’t, then one of these handy steps will help to get your USB running properly again.
However, before undertaking any of these steps, then you should always ensure that you back up or transfer your data currently stored on your USB before trying these methods.
If you’d like more USB advice, or you’d like to learn more about our extensive product ranges, why not get in touch with us today?


